Multisig Transactions
Important: Before following this guide, make sure you have completed the full project setup. See the Quick Start guide for installation and configuration instructions.
This guide walks you through executing a multi-signature transaction using the Web DApp. The example performs a freeze operation with a 2-of-2 multisig account, where both signers must approve before execution. We recommend using HashPack as the wallet.
Note: Multisig requires a native Hedera wallet. We recommend HashPack, which you can connect via WalletConnect. MetaMask and other EVM-only wallets are not supported.
Prerequisites
- The full project setup must be completed (see Quick Start).
- A multisig account on Hedera with a key list (e.g., 2-of-2).
- A token associated to the multisig account.
- The multisig account must have enough HBAR to pay for transaction fees.
Don't have a multisig account yet? Helper scripts are available in
packages/sdk/example/ts/multisig/to quickly create a multisig account and associate a token for testing purposes. See the Demo Setup section at the bottom of this guide.
Step 1 — Start the Backend
The multisig feature depends on the backend service. Navigate to the apps/backend folder and bring it up:
- Place the required
.envfile in the backend directory. - Start the services:
docker compose up -d --build
Step 2 — Configure Permissions
- Open the Web DApp.
- Log in with one of the signer accounts using HashPack.
- Select the token associated to the multisig account.
- Assign a role to the multisig account. For this example, assign the freeze role.
- Log out.
Note: The multisig account must have the appropriate role for the operation you want to perform. In this example we use
freeze, but you can assign any role (e.g.,cashin,burn, etc.).
Step 3 — Connect with the Multisig Account
- In the connection modal, select Multisig account.
- Choose the network and enter the multisig account ID. Click Connect.
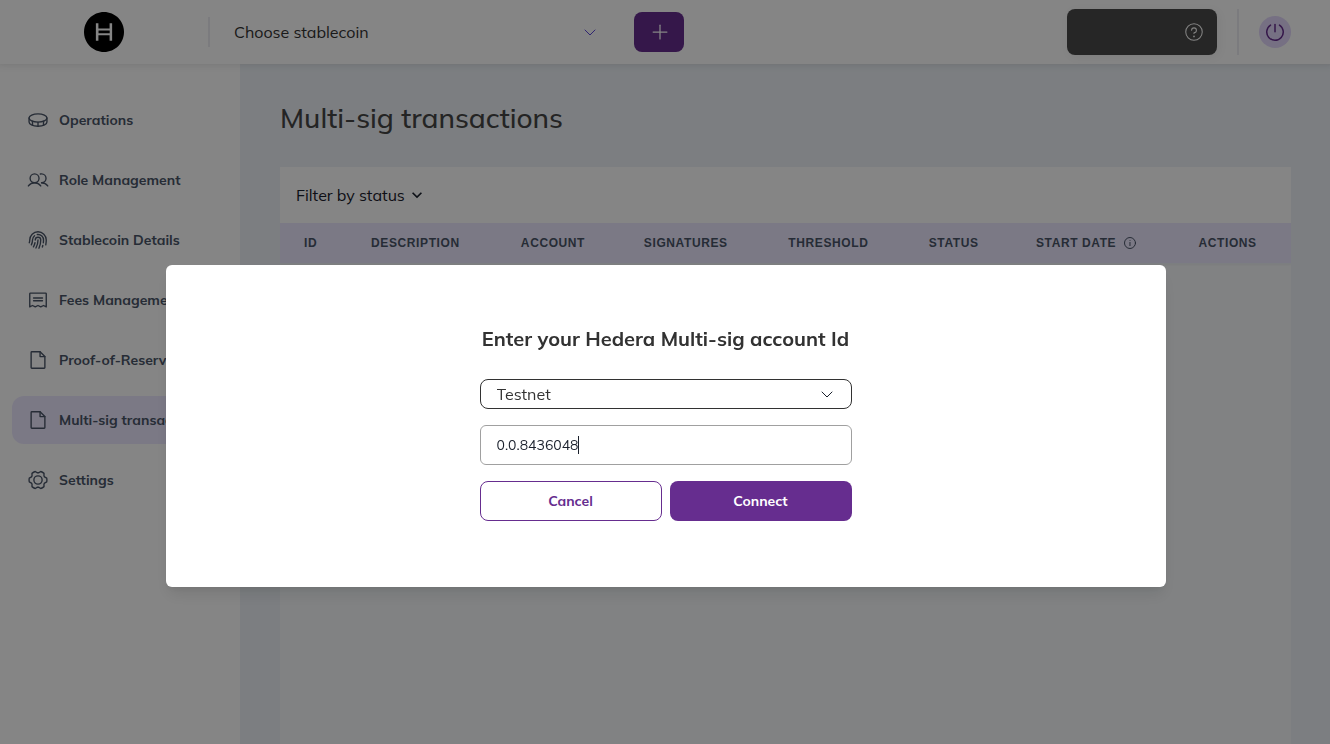
- Select the stablecoin you want to operate with from the dropdown at the top.
Step 4 — Create a Multisig Transaction
- Go to Operations and create a freeze transaction:
- Target account: any account associated with the token.
- Execution time: set a future timestamp (e.g., current time + 5 minutes). This is when the backend will submit the transaction to Hedera. All signatures must be collected before this time.
- Confirm the transaction. It will appear with a
pendingstatus.
Step 5 — Sign the Transaction
Each signer in the key list must approve the pending transaction individually:
- Log in with the first signer account using HashPack.
- In the sidebar, go to Multi-sig transactions.
- Find the pending transaction and sign (approve) it.
- Log out.
- Log in with the next signer account using HashPack.
- Repeat steps 2-3.
The transaction status will remain pending until all required signatures are collected.
Step 6 — Execution and Verification
Once all signatures are collected, the transaction status changes to SIGNED. You can Delete it if you want to cancel it before the scheduled execution time.
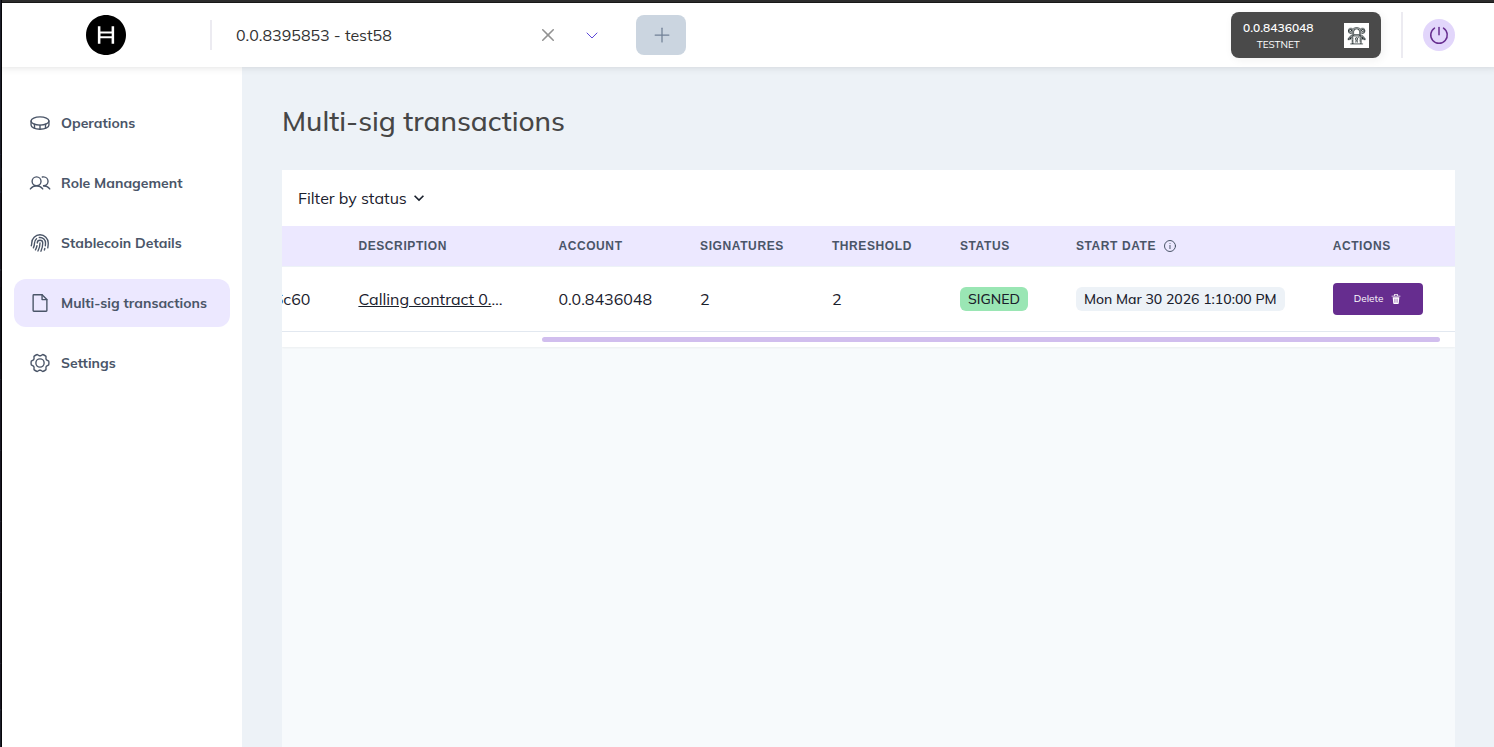
When the scheduled execution time arrives, the transaction is automatically submitted to the Hedera network and the status will update to executed. Verify the operation took effect (e.g., the target account should now be frozen).
Warning: If the multisig account does not have enough HBAR to cover transaction fees at execution time, the transaction will fail.
Demo Setup (Testnet only)
The steps above describe how to use the multisig feature in the Web DApp. If you don't have a multisig account or an associated token yet, we provide a set of helper scripts in packages/sdk/example/ts/multisig/ so you can quickly set up a testing environment on testnet.
Important: These scripts are intended for testnet only. Do not use them with mainnet accounts or private keys.
You need two Hedera accounts with ECDSA private keys. If you don't have them, create them in the Hedera Developer Portal.
1. Create a Multisig Account
This helper script creates a new Hedera account with a 2-of-2 KeyList, meaning both signer keys must approve every transaction made from this account.
Open packages/sdk/example/ts/multisig/CreateMultisigAccount.ts and edit the following variables:
ECDSA_1_PRIVATE_KEY— ECDSA private key of the first signer account.ECDSA_2_PRIVATE_KEY— ECDSA private key of the second signer account.FEE_PAYER— The account that will pay the cost of creating the multisig account. It must have funds in the testnet.id— Account ID (e.g.,0.0.12345).privateKey— ECDSA private key of the account.
const ECDSA_1_PRIVATE_KEY = '';
const ECDSA_2_PRIVATE_KEY = '';

const FEE_PAYER = {
    id: '',
    privateKey: '',
};
From the packages/sdk/example/ts folder, run:
npm run execute:createMultisig
Save the resulting multisig account ID and send HBAR to it for transaction fees.
2. Associate a Token
This helper script associates an existing token to the multisig account. This is required before the multisig account can operate with that token.
Create a token using the CLI or Web DApp. Then open packages/sdk/example/ts/multisig/AssociateToken.ts and edit the following variables:
ECDSA_1_PRIVATE_KEY— ECDSA private key of the first signer of the multisig account.ECDSA_2_PRIVATE_KEY— ECDSA private key of the second signer of the multisig account.MULTISIG_ACCOUNT_ID— The multisig account ID created in the previous step (e.g.,0.0.12345).TOKEN_ID— The token ID to associate to the multisig account (e.g.,0.0.67890).FEE_PAYER— The account that will pay the cost of the token association. It must have funds in the testnet.id— Account ID (e.g.,0.0.12345).privateKey— ECDSA private key of the account.
const ECDSA_1_PRIVATE_KEY = '';
const ECDSA_2_PRIVATE_KEY = '';

const MULTISIG_ACCOUNT_ID = '';

const TOKEN_ID = '';

const FEE_PAYER = {
    id: '',
    privateKey: '',
};
From the packages/sdk/example/ts folder, run:
npm run execute:associateToken
Once done, return to Step 1 to continue with the guide.